Menu Planning Central

Making Life Easier Since 2007!

  • Home
  • About
    • Lifetime Member Update
  • Menus
    • Current Family Favorites Recipes
    • Family Favorites – Free Week
    • Family Favorites Menu Plan
    • Healthy 30 Minute Meals – Free Week
  • Recipes
  • Contact
  • Login
    • Affiliates
  • Cart

Easy Instant Pot Carnitas

Spread the love
  •  
  •  
  •  
  •  
  • 102
  •  
  •  
  •  
  •  

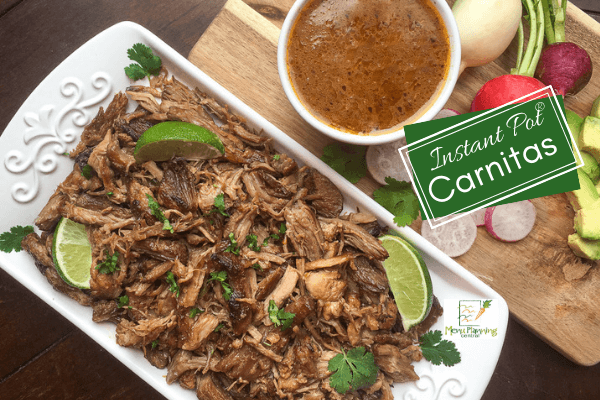
This Easy Instant Pot® Carnitas recipe turns out soooo tender and juicy and is loaded with so much flavor.  

This pressure cooker Mexican carnitas recipe is extremely versatile allowing the fall-apart-tender pork to be served in so many different ways. The beautifully seasoned, tender Mexican pork is delicious on its own, but a few of my favorite ways to serve it is in festive tacos, healthy lettuce wraps, in salads, or even served over rice.

The instructions for this recipe include a couple of optional steps that can be omitted if you are crunched for time. For example, the aromatic blend of onion, jalapeno, and garlic does not need to be sautéed before cooking the pork, but doing so deepens and releases the most flavor. Additionally, the pork can be shredded and served as soon as it is finished cooking. The extra step of tossing it with some of that gorgeous cooking liquid and broiling under high heat delivers the golden delicious, crispy edges found in traditional carnitas recipes.  You could, of course, skip this step, but I highly recommend taking the extra few minutes.  It really brings out the very best flavor!

This easy and delicious recipe is part of our Family Favorites Menu Plans.
(Save $10 on our signature annual menu plan with coupon code Save10!)

Pressure Cooker Mexican Carnitas

Print

Instant Pot® Carnitas

Easy Instant Pot® Carnitas recipe. Juicy, tender, and loaded with great Mexican flavor.
Course Appetizer, Main Course
Cuisine Mexican
Keyword Easy Dinner Recipe, Easy Instant Pot® Carnitas, Instant Pot Recipes, Pressure Cooker Mexican Carnitas
Prep Time 15 minutes
Cook Time 55 minutes
Approx. NPR Time 25 minutes
Total Time 1 hour 10 minutes
Servings 4
Author Menu Planning Central

Ingredients

  • 3/4 c. chicken broth preferably organic
  • 3/4 c. fresh orange juice approximately 2 large oranges
  • 3 T. lime juice
  • 1 T. chili powder
  • 1/2 t. smoked paprika
  • 1 t. dried Mexican oregano
  • 1 t. ground cumin
  • Sea salt and black pepper to taste
  • 2-3 T. extra virgin olive oil divided
  • 3-1/2 - 4 lbs. pork shoulder roast trimmed and cut into 6-8 chunks
  • 1 medium red onion diced
  • 1 medium jalapeno diced
  • 2-3 cloves fresh garlic peeled and chopped

Instructions

  1. In a medium bowl, whisk together chicken broth, fresh orange juice, and lime juice with the chili powder, smoked paprika, Mexican oregano, and ground cumin. Season with salt and black pepper, to taste, and set aside.
  2. Push the “Sauté” button on Instant Pot®. Once the display reads “On,” add 1 tablespoon olive oil and half the pork shoulder pieces to the container. Season with salt and black pepper, to taste, and cook until pork is browned on all sides, approximately 1-2 minutes per side.  Note: DO NOT use lid while using the “Sauté” function on an Instant Pot®!

  3. Once browned, transfer seared pork to a plate and repeat this process with additional olive oil and the rest of pork. Remove browned pork from the Instant Pot and set aside.
  4. *Optional Step: Add remaining tablespoon olive oil to the container, along with red onion, jalapeno, and fresh garlic. Sauté, stirring occasionally, until soft and translucent, approximately 3-4 minutes.
  5. Add browned pork back to the pot and pour chicken broth/orange juice mixture over top. Add lid and seal, making sure the steam release handle is positioned toward “Sealing.”
  6. Press the “Manual” button and set the time to 30 minutes at high pressure. Once the cooking time is up, allow 20-25 minutes for the “natural release” of the steam inside the Instant Pot®. After that time, perform a manual “quick release” to vent any remaining steam to release lid, if necessary.
  7. A few minutes before the steam is fully released, preheat oven broiler to high and line a large, rimmed baking sheet with aluminum foil. Transfer pork to the prepared baking sheet and gently shred with two forks. Drizzle with ¼ cup juices from the Instant Pot® and toss to combine before spreading into a thin, even layer.
  8. Place pork under broiler for 4-5 minutes, then remove from oven and add a little more juice before turning the meat to brown the other side. Place back under broiler for another 4-5 minutes or until the pork is nice and crispy on the edges.
  9. Once pork is under the broiler, press “Sauté” on the Instant Pot to reduce the cooking liquid by one half while the pork is broiling.
  10. When finished broiling, remove baking sheet from oven and serve immediately with the reduced cooking liquid, fresh lime wedges, and chopped cilantro. Enjoy!

Recipe Notes

Important - Different Instant Pot® models and other electric pressure cookers offer different features and buttons. (These instructions are for the IP-Duo series).

Know Someone Who Might Like This Recipe?
Check out Our Popular 
“Refer A Friend” Program Here! 

Pressure Cooker Mexican Carnitas


Instant Pot Savory Thai Chicken Thighs

Spread the love
  •  
  •  
  •  
  •  
  • 129
  •  
  •  
  •  
  •  

Affordable Thai Chicken ThighsThese savory Thai chicken thighs are perfect when you are looking for a quick and delicious dinner recipe.  This affordable Thai chicken thigh recipe is made in your Instant Pot®, which means you can serve this dish on this busy weeknights. (Using chicken thighs in this recipe keeps it affordable, moist and juicy). If you are lucky enough to have leftovers, they can be shredded to make easy, healthy lettuce wraps for lunch the next day.   

Instant Pot® Success Tip: Liquid ratio matters so be sure to add enough liquid to the peanut sauce prior to cooking. If the sauce is too thick, the Instant Pot® may not reach proper pressure. If you decide to add more peanut butter, you will want to be sure you adjust the amount of liquid also.

Tip: To get the nice browning effect shown in these images, transfer the chicken thighs to a large, rimmed baking sheet lined with aluminum foil after cooking. Brush each side generously with the peanut sauce and place under a broiler set to high for 2-3 minutes or until nicely browned.

Prep time: 10 minutes
Cook time: 10 minutes (+ time to come to pressure)
Serves: 4-6

Ingredients:

2 T. sesame oil
2 lbs. boneless, skinless chicken thighs
2/3 c. chicken broth
1/4 c. sugar-free peanut butter
1/4 c. gluten-free soy sauce or coconut aminos
2 T. fresh lime juice
2 T. honey, preferably local
1-1/2 T. Sriracha sauce
2 t. fresh ginger
1 t. garlic powder
Sea salt and black pepper, to taste

Garnish:

Fresh cilantro, chopped
½ c. roasted peanuts, chopped
3-4 green onions, cut into thin slices

Directions:

  1. Add sesame oil to Instant Pot® and set the “Sauté” setting to high. Working in batches, brown the chicken thighs, approximately 3-4 minutes per side. Repeat this process with remaining thighs. Remove and set aside on a platter.
  2. Pour chicken broth into hot container and gently scrape up brown bits from bottom. Add peanut butter to the hot liquid and stir until completed melted. Add soy sauce, lime juice, honey, Sriracha sauce, ginger, and garlic powder. Season with salt and black pepper, to taste, and stir to combine.
  3. Add the metal rack to the Instant Pot® and place the browned chicken thighs on top.
  4. Add lid and lock into place. Switch vent to “Sealing” position and set the “Manual” setting on high before adjusting the cook time to 10 minutes. After a brief pause, the Instant Pot® will automatically start building pressure.
  5. When finished, do a quick release (QR) to allow the pressure to escape. Unlock and carefully remove lid when finished and transfer the chicken to a platter.
  6. Optional: To thicken sauce, select the “Sauté” setting and heat, stirring continually, until the excess liquid is reduced and the sauce reaches the desired consistency.
  7. Turn Instant Pot® off and return the chicken thighs and the juices that accumulated on the platter to the sauce and turn to coat.
  8. Remove chicken and transfer to a serving tray. Garnish with chopped fresh cilantro, chopped peanuts, and green onions, if desired. Serve immediately with extra peanut sauce and your favorite sides.

If you like this savory Thai chicken thigh recipe, you will love our Family Friendly Menu Plans!

Save $10 on our convenient annual plan with coupon code Save10!

Affordable Thai Chicken Thighs

Instant Pot® Cherry BBQ Baby Back Ribs

Spread the love
  •  
  •  
  •  
  •  
  • 60
  •  
  •  
  •  
  •  

Instant Pot BBQ Ribs
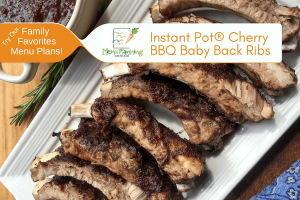
These succulent cherry BBQ baby back ribs are fall off the bone tender thanks to the Instant Pot®!  These are sure to become a new family favorite that they will be asking for again and again.  This recipe is so easy and delicious, you will be happy to add it to your menu planning rotation.
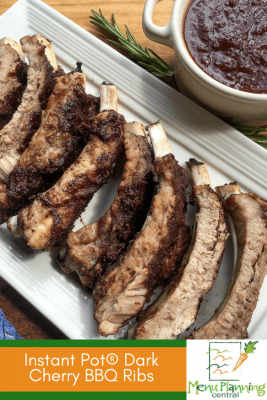
What’s the secret? It’s the unique combination of cinnamon and rosemary in the dry rub we use that really enhances the flavor of this Amazing Dark Cherry BBQ Sauce! The great thing is that if you want to change it up once in a while, the flavors of our dry rub pair well with just about any barbeque sauce. These ribs are super fast and easy to make, AND they taste like they’ve been cooking all day long. 

Pressure Cooker BBQ RibsTip: To achieve that signature mouth-watering, caramelized crust we all love on our ribs be sure to place cooked ribs under a hot broiler or on the grill for a few minutes after cooking in the Instant Pot®. 

Prep time: 10 minutes
Cook time: 30 minutes + time to come to pressure
Serves: 4

Dry Rub Ingredients:
1 t. garlic powder
1 t. chili powder
1 t. dried rosemary
1 t. ground cumin
½ t. cinnamon
¼ t. cayenne pepper
½ t. smoked paprika
Salt and black pepper, to taste

Other Ingredients:

2½ – 3 lbs. baby back ribs
1 c. beef stock (or water)
Dark Cherry BBQ Sauce* (or BBQ sauce of choice)

Directions:
1. Combine ingredients for the dry rub in a small bowl and stir to combine. Set aside.
2. Carefully remove membrane from back of baby back ribs with a sharp knife, if necessary. Cut the ribs into 3 or 4 equal-sized parts and massage the dry rub into each section on both sides. Set aside.
3. Add beef broth or water to Instant Pot® and insert the metal rack. Place the seasoned ribs on their sides, meaty side out on top of the insert. (Do not stack them flat on top of each other).
4. Lock the Instant Pot lid into place and flip the pressure valve to “Sealing.” Set the “Manual” setting to high for 30 minutes.
5. Meanwhile, line a large, rimmed baking sheet with aluminum foil and set aside.
6. Once cooking time is complete, do a quick release (QR) by flipping the sealing valve to the “Venting” position. Unlock and remove the Instant Pot® lid and carefully transfer ribs to prepared baking sheet. Brush ribs with a generous amount of BBQ sauce on each side.
7. Pre-heat broiler to high and broil the ribs for 3-5 minutes or until nicely browned. Remove from oven and cool slightly before cutting into individual portions. Serve immediately with extra BBQ sauce for dipping.

If this is a recipe your family enjoyed, you will really love our Family Friendly Menu Plans!  Save $15 on our convenient annual plan with Coupon Code Save15!

Are you part of our “Refer A Friend” program? If not, click this link for details! ?


Amazing Dark Cherry BBQ Sauce

Spread the love
  •  
  •  
  •  
  •  
  • 9
  •  
  •  
  •  
  •  

Dark Cherry BBQ Sauce
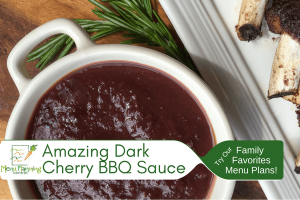
This homemade sweet and smoky BBQ sauce will take your BBQ ribs to the next level.   It gets its rich amazing flavor from taking sweet dark cherries and rich maple syrup and combining them with the warmth of fresh ginger, cinnamon, and rosemary.  It is so simple and quick to make in your Instant Pot®.  You’ll never want to use store-bought BBQ sauce again!

The flavors with deepen as this sauce sits in your refrigerator so if you have time, you will want to make this a day or two in advance.   If you are in a pinch though, don’t worry.  It will still taste great.

Prep time: 5 minutes
Cook time: 10 minutes + time to come to pressure
Serves: 6-8

Ingredients:
2 T. extra virgin olive oil
1 medium shallot, finely chopped
3-4 cloves fresh garlic, finely minced
2½ c. fresh or frozen dark cherries, pitted
1 10-oz. can diced tomatoes with green chilies, with liquid
3 T. apple cider vinegar
2 t. fresh ginger, finely minced
1½ t. ground cinnamon
½ t. smoked paprika
3 T. maple syrup
1 T. fresh rosemary, finely chopped
2 t. liquid smoke (optional)
Sea salt and black pepper, to taste

Directions:
1. Add olive oil to Instant Pot® and select the “Sauté” function on the high temperature setting. Add shallot and garlic and sauté until soft and slightly golden, approximately 3-4 minutes.

2. Turn Instant Pot® off and add remaining ingredients, including the liquid from the tomatoes and the liquid smoke, if using. Stir to combine and season with salt and black pepper, to taste.

3. Add lid and lock into place. Make sure the valve is set to the “Sealing” position and set the “Manual” setting to high for 10 minutes. After a brief pause, the Instant Pot® will automatically start building pressure.

4. When finished cooking, do a quick release (QR) of the pressure according to the manufacturer’s suggestions before unlocking and removing the lid.

5. Transfer the sauce to a blender or food processor and puree until smooth. Use immediately or store in an airtight container in the refrigerator for 7 to 10 days.

Note: For a thicker sauce, return to the Instant Pot® and bring to a low boil using the “Sauté” function set to high. Heat, stirring frequently, until the excess liquid is reduced and the sauce reaches the desired consistency.

If you have enjoyed this tasty Instant Pot® BBQ sauce recipe, share this link with a friend and check out our  signature Family Favorites Menu Plans featuring all ‘homemade’ recipes your family will love! 

You can even save $15 on our convenient annual plan with Coupon Code Save15!

Are you a member of our “Refer A Friend” program? If not, click this link for details! 🙂

Search this site…

Try Family Favorites Menu Plans for 7 Days - Free

Our Favorite Recipes

20 scrumptious apple recipes

20 Scrumptious Apple Recipes

Spread the love
  •  
  •  
  •  
  •  
  • 96
  •  
  •  
  •  
  •  

Spread the love    96     I love fall, and I love all the apple and pumpkin recipes that are so popular at this time of year! Today I’ve got a great round-up for you of 20 yummy apple recipes! Check these out: 1. Healthy Spicy Pumpkin and Apple Crumble Squares:  Lots of yummy whole foods, and of […]

Copycat Starbucks Hot Chocolate Recipe

Spread the love
  •  
  •  
  •  
  •  
  • 31
  •  
  •  
  •  
  •  

Spread the love    31       Are you ready for hot cocoa season?!  Now you can enjoy your favorite Starbucks Hot Cocoa treat from the comfort of home, inexpensively!  Here’s what you need: 2 tablespoons of sugar 2 tablespoons unsweetened cocoa 2 tablespoons water ¼ cup water 1½ cup milk (any kind will do) ¼ teaspoon vanilla […]

Fresh Strawberry Mango Salsa

Fresh Strawberry Mango Salsa

Spread the love
  •  
  •  
  •  
  •  
  •  
  •  
  •  
  •  
  •  

Spread the love          Take advantage of the availability of fresh, juicy strawberries and soothing, smooth mango with this beautiful and delicious recipe! INGREDIENTS 1 cup strawberries-diced 1 cup mango-diced 1 Tablespoon sugar 1/4 red onion – diced 1 jalapeno – seeded and minced  2 Tablespoons cilantro-chopped 3 Tablespoons honey 3 Tablespoons lime juice Optional – […]

Grilled Herb-Rubbed Bone-In Pork Chops

Grilled Herb-Rubbed, Bone-In Pork Chops

Spread the love
  •  
  •  
  •  
  •  
  • 13
  •  
  •  
  •  
  •  

Spread the love    13    Affiliate links are used in this post. Looking for something different for dinner tonight?  Your family is going to LOVE these moist and juicy grilled pork chops!   You will want to check out our signature Family Favorites Menu Plans for even more delicious and easy recipes your family will love! Grilling pork […]

20 Sweet Valentine’s Day Treats for the Classroom

Spread the love
  •  
  •  
  •  
  •  
  •  
  •  
  •  
  •  
  •  

Spread the love          It’s party time and your kids need treats for their Valentine’s Day celebration! We’ve got a great round-up of the cutest, yummiest creations you can whip up in your kitchen! Love Letter Cookies DIY Conversation Hearts Play Dough Cookie Pops Valentine’s Day Airplanes Heart Cookie Sandwiches White Chocolate Popcorn Chocolate Covered Pretzels […]

Baked White Sweet Potato Fries

Spread the love
  •  
  •  
  •  
  •  
  •  
  •  
  •  
  •  
  •  

Spread the love         Affiliate links are used in this post. Sweet potatoes are known for their gorgeous deep orange color that has become synonymous with their delicious flavor. But did you know that there are some varieties of sweet potatoes that have a pale yellow flesh, more like a Yukon Gold potato?  It’s true!  Some varieties, like the […]

How To Choose The Right Slow Cooker

Spread the love
  •  
  •  
  •  
  •  
  •  
  •  
  •  
  •  
  •  

Spread the love         Affiliate links are used in this post. Are you ready to give cooking in a slow cooker a try? It’s a wonderful way to prepare your family’s meals without having to spend hours in the kitchen stirring. Make a pot of beef stew that tastes like you’ve slaved for hours over the stove, […]

Slow Cooker Mexican Chicken

South of the Border Slow Cooker Chicken

Spread the love
  •  
  •  
  •  
  •  
  • 4
  •  
  •  
  •  
  •  

Spread the love    4    If you’ve been searching for a healthy and delicious slow cooker chicken recipe, you’ve found it!  This Mexican inspired dish is loaded with flavors from South of the border.  It is so simple to make and can be served in so many different ways. It is perfect for burrito bowls, in lettuce wraps, […]

  • About
  • Contact
  • Member Login
  • Affiliates
  • Privacy & Disclosures
  • Terms

Copyright © 2023 · MenuPlanningCentral.com